How To Rebuild the KLR650 Monoshock
CONTENTS COPYRIGHT 2003, NOT TO BE USED OR REPRINTED WITHOUT PERMISSION.
APRIL 28, 2003: PROCEDURE UPDATED REGARDING GRINDING OF PEENING, SEAL HEAD O-RING, TIPS FOR PUSHING IN SEAL HEAD.
When I noticed my KLR650 shock was leaking, I was dismayed to find that a
replacement cost around CDN$750/US$450, aftermarket or stock. After extensive research, I found that there were repair parts listed for sale, and that some suspension shops, Race Tech for example, will rebuild it, so clearly it could be done.
Having lots of winter project time to spare, I decided to make give it a go myself. I had never worked on a shock before, but figured if it didn't work, nothing lost, while if it did work, I would be about $700 ahead and would also gain some useful knowledge.
This article is how I did it. No guarantees it will work for you, but I've just done my second one and it worked fine again. Many, many thanks to
MX Off-Road.com
for their excellent series of technical articles, which gave me the base of knowledge for this non-MX project.
How good are the results?
After testing, I have found that the rebuilt shock is a slight improvement over stock, probably because there is now clean, good quality oil and the proper amount of compressed nitrogen gas in there. I find that it gives me a nice ride on the road, while off-road, I have good control over jumps and bumps. Good enough for me!
What youll need:
- KLR650 shop manuals: pricey, but well worth the money.
- Seal head assembly) and O-ring. See Seal Sources section below.
- Rotary grinding tool (Dremel-type). There are good ones available for very little money these days. In Calgary, check out Totem Lumber, I got mine there for $40.
- Oil measuring cup graduated in cc (mL). Local hardware stores sell house plant sprayers for about $2 that are graduated in 10 cc increments.
- Red thread locking compound (e.g. Loctite)
- Torque wrench
- Spring compression tool. Many motorcycle acessory places sell them. The automotive type with double hooks on the jaws will not fit your spring, becasue they are curved for larger diameter auto springs.
- Vise or Workmate-type workbench.
- Optional: painting supplies for spring and shock, in paint colors of your choice. For the spring, any body shop supply shop can make up an aerosol cans of paint with flex agent added for about $25.
Seal Sources
The critical oil seal is carried within what's called the "seal head." A new seal head is quite inexpensive, and has the new oil seal and dust seal already installed, so its a simple remove and replace job. Get part # 21-1108, $US27.45 from Pro-Tec (www.pro-tecperformance.com) , 41376 Pear Street Murrieta, CA 92562 Telephone (909) 698-8988 Fax: (909)698-6083.
Additional sources are:
- Race Tech (www.race-tech.com) 1501 Pomona Road, Corona, CA 92880-6959, USA, Telephone (909) 279-6655, Fax (909) 284-0417 (International). You can also send the shock to them, and they will rebuild for US$200 and re-valve it for an additional US$150.
- Suspension Builders Warehouse (www.mx-tech.com/SBW/index.asp), 4136 W. 6940 N. Rd., Bourbonnais, IL USA 60914, Telephone (815) 936.6277, Fax: (815) 936.9913.
Gold Valve upgrade
Although Race Tech doesn't list the valve on their web site, I'm told you can get a Race Tech Gold Valve from
Precision Concepts Racing
, who will do mail order. The shock revalve is US$149, the Gold Valve is US$139 and a spring is US$99. I have not gone this route, but I'm told it's available if you want it.
Procedure:
DISCLAIMER: If you undertake this procedure it constitutes agreement on your part that any damage or destruction you cause to yourself or others is your responsibility alone.
Questions? E-mail calgarydualsport@lycos.com ; I'll try to get back to you ASAP.
1. Remove shock from bike. Caution: if removing the footpeg mounts, take care to keep the rear brake reservoir upright so the fluid doesnt run out.
2. Remove spring, either with correct tool or by taking to a dealer or suspension shop.
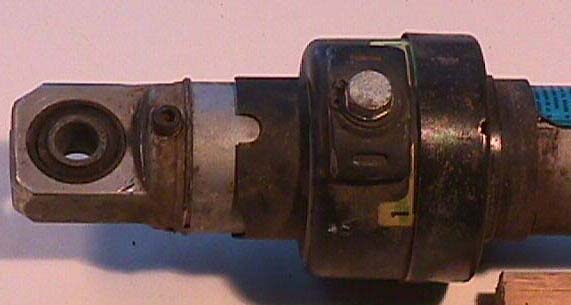
Preload adjuster is held in place by a wire ring clip. The small allen bolt is there in case the ring fails - on a KX250, it would be the bleed screw. Before removing the allen bolt, apply penetrating oil, as it may be corroded and tight in the aluminum threads.
3. Carefully remove allen bolt and preload adjuster wire retaining ring, then slide the preload adjuster off.
Components in preload adjuster.
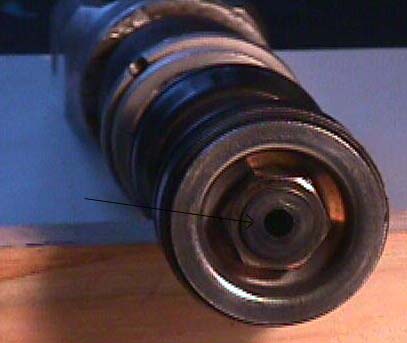
4. Pry off cover off the tire-type nitrogen valve and discard cover. Put on your safety glasses, and position yourself so the valve is pointing AWAY from your eyes and anything else you dont want sprayed with dirty oil.
5. Press down on the valve core to relieve any pressure remaining in the shock. There may be some pressure remaining even if the shock seal is blown and leaking. Once all pressure is released, remove the valve core, clean it and set it aside.
6. Remove the shock from the vice. With the valve pointing down, hold the shock over your waste oil catch tray. Pump the shock up and down to release as much oil as possible.
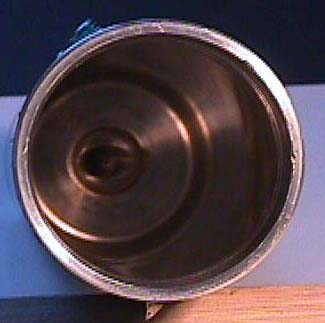
7. Clamp the shock eye end in the vice. Using a drift punch placed at an angle into the holes on either side of the lower cap, gently tap the cap off, alternating from side to side to drive the cap off evenly. Clean out any dirt and oil that may be in the cavity.
8. Push the seal head down into the shock. This is one of the most bothersome parts of the job, as the seal head can be hard to push. Try slipping a 19mm or so open end or flare nut wrench around the shaft, then push the cap down on that to get even pressure. Tapping it down with a punch works, but try to use a hardwood dowel or brass punch to not mark up the head too much.
However you do it, push it down until you can see the TWO retaining rings (yes there are two). They are similar to the ring that holds the preload adjuster on the outside of the shock.
9. Use a thin awl or knife, work one ring out of its groove (easiest if you do this in the middle, not right at the ends) and push it down. Then keeping the knife over the groove so the ring cant snap back in, slip the ring up and remove. Remove the other ring.
10. Pull up on the clevis end to wiggle the shaft and seal head out of the shock tube. Oil may spew out all over the place (if there's any left in the shock), so have shop rags and trays ready.
Examine the O-ring on the seal head. It's probably still in good condition as it is not a moving part. If it's cracked or otherwise suspect, and if your new seal head did not include a new O-ring, you'll need to call your supplier to order a new O-ring. Set shaft assembly to soak in a tray of solvent in preparation for cleaning.
11. Clean up the shock tube assembly. Note that it is actually aluminum (good on you, Kawasaki), just painted to look like the cheapest steel possible. Think about a color to paint it if you want, but dont paint yet it will get knocked about some while reassembling. Set aside to dry.
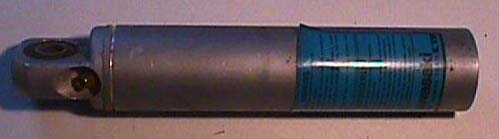
A little heat e.g. with a blow dryer and some solvent can remove the sticker from the shock tube.
Yep, it's aluminum.
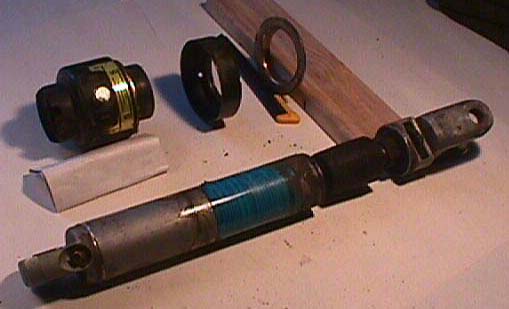
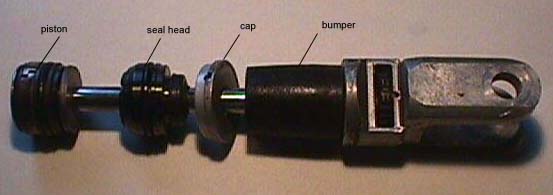
12. Take a long look at the shaft assembly and how things fit together. The seal that needs replacing is down inside the seal head, and you have to take off the piston to get at it.
13. To remove the top nut that holds things together, youll first need to remove the peening (bent-over part) that keeps the nut from coming off. Use the rotary tool to grind away metal ONLY TO SLIGHTLY LESS THAN THE OUTSIDE DIAMETER OF THE SHAFT. LEAVE THE INSIDE PART OF THE PEENING AS IS.
End of shaft peened.
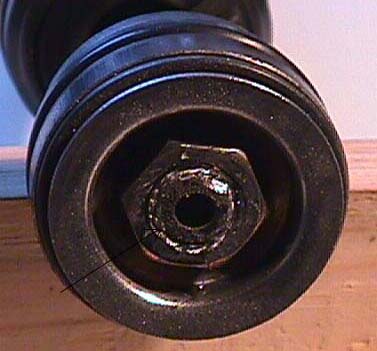
Peening ground off.
14. Clamp the clevis end of the shaft in your vice, and use a socket to remove the nut. It may need a bit of force to get started as it is also held in place with red thread locking compound.
15. Lift off the valve assembly as a unit. Slip a string or zip tie through the center and tie it so the many little parts dont get out of order. Clean up and set aside.
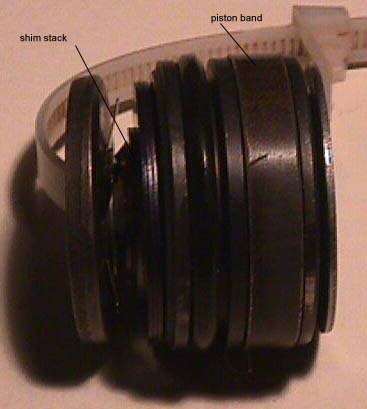

If you happen to lose the order, here's how it goes back together, starting from the bottom (left):
- thick washer
- "spider" spring, arms facing up
- thin three-eared shim
- thick three-eared shim
- small thin shim
- small thick shim
- big thin shim
- big thick shim
- small thin shim
- deep cup, facing up
- tall washer
- shallow cup, facing up
16. Slip off the seal head and rubber bumper, clean them up and set them aside.
Resist the urge to disassemble the damping force adjustment inside the shaft. It can be done, but it is not necessary and is very frustrating to reassemble properly. Just clean it up with solvent and set aside to dry.
17. Clamp the shock shaft clevis end down in the vice. Make sure the bumper and retaining cap are in place on the shock shaft.
18. Check if your new seal head comes equipped with an O-ring. If not, carefully remove the O-ring from the old seal head and check it for cracks etc. If it's still in good condition, as it probably will be, lube it with some shock oil and and slide it in place on the new seal head. If it's not in good condition, call your seal head supplier to get a new O-ring.
19. Slowly and carefully slip the new seal head on to the shaft, then slide the valve assembly back on to the top of shaft.
THIS NEXT STEP IS VERY IMPORTANT - DO NOT SKIP IT OR GUESS AT IT. IF THE NUT COMES OFF WHILE RIDING THE BIKE, LOSS OF CONTROL WILL RESULT.
18. Apply red thread locking compound to the shaft nut and torque it to 24 foot-pounds.
20. Screw the valve core back into the clean shock tube, clamp the tube eye end down in the vice and pour 130 cc of shock oil into the tube. Set an oil catch tray under the vice things may get oily now!
21. Slip the shock shaft and seal head into the shock tube. Press down far enough to displace most of the air, but dont worry about getting it all out that comes later.
22. Press the seal head down past the retaining ring grooves and reinstall the retaining rings. Using simple compressed air from a tank or pump, pressurize the shock to 150 lbs. to seat the seal head against the retaining rings.
23. Using a scrap piece of wood as a punch, reinstall the lower cap, tapping on alternate sides to drive it into place evenly.
NOTE: For the next step, the shock should be warm so any air bubbles flow quickly through the oil. If youre working in the cold, take the thing into the house while you have a cuppa.
24. With the eye end up, slowly work the shock up and down by hand to allow any bubbles to rise to the top of the oil.
25. Lay the shock flat with the valve core pointing up. Support it with shop rags to keep it from rolling around. Holding the valve open with a pointed object, slowly slide the shaft into the shock until air bubbles stop appearing and only oil oozes up. Release the valve core to stop air from getting back in.
26. Dont worry too much about a tiny bit of air remaining in the shock, because air is after all about 78% nitrogen, which is what youll be refilling with anyway. Bleeding out air does bleed out the moisture that may in the air. Moisture contaminates the oil, reducing performance.
27. Slide the preload adjuster assembly on and reinstall the retaining ring and allen bolt, using anti-seize compound or grease to prevent corrosion (you'll be doing this every spring from now on!).
28. Take the rebuilt shock to a dealer or suspension shop be charged with 150 psi of dry nitrogen (cost=$5 to $15, depending where you go; in Calgary, Pro Am Kawasaki is fast and inexpensive).
29. Reinstall the shock in the bike, using blue thread locking compound on the bolts and tightening the subframe mounting bolts to the torque values specified in the manuals.
Enjoy a fresh ride, and enjoy having saved hundreds of dollars!
Home Page